Building your own sauna can be a very rewarding experience that will provide a lifetime of enjoyment once the project is complete. For many people familiar with power tools, it’s entirely possible to build your own sauna from scratch, no matter the size.
If you’ve ever framed a room before, or even operated a saw and an air nailer, you are well qualified to build your own sauna. Building your own sauna has the additional benefit of cost savings. If you need any sauna materials, heater, doors, or guidance on building a custom sauna give us a call at 612.505.9700 or submit a form online!
In the video below, we demonstrate a start to finish video of our team installing one of our custom indoor saunas. This particular sauna was a pre-cut custom DIY kit built of Western Red Cedar.
Here Is The Complete Guide To Building Your Own Sauna
You will need, materials for building the sauna itself. Below, you’ll find an complete list of sauna building materials with what you’ll need and where to buy them. You’ll need tools for building your sauna and finally, you’ll need to know how to install the sauna once you have acquired all of the materials and tools needed for it’s construction.
We have written this guide to be as comprehensive as possible. Along the way, you may find that you are able to save on certain things by re-purposing, or may not need due to the space you are working with.
The video below shows the entire process of building your own sauna using one of our pre-cut custom sauna kits.
We Sell This Entire Package As A Sauna In A Box. If you read this article and decide that making cuts, determining the optimal sauna layout, building benches and selecting the right size heater is not for you, give us a call at (612)505-9700. One of the most popular sauna kits we sell is our pre-cut DIY custom sauna kit. This is a sauna that is cut to your exact dimensions and delivered right to you door. It’ll include everything you need to build the assemble the entire sauna itself, ready to take steam quickly.
Material List for Building Your Own Sauna
The actual material list for everything that is necessary to build a sauna is listed below. Within each section, we’ve explained it’s importance and some pros and cons to doing each step in an alternative way.
- Insulation
- Vapor Barrier
- LED Lighting
- Sauna Heater
- Heater Contactor Box
- Sauna Door
- Clear Benching Material
- Clear Bench Backrest Material
- Tongue and Groove Sauna Wood
- 16 gauge air nails
- 23 gauge air nails
- Screws
Sauna Insulation
Once your space has been framed, you’ll need to insulate your sauna. Our sauna kits do not come with insulation due to it’s size in shipping, so if you opt for a custom pre-cut kit, you’ll have to make sure this step is completed prior to installing your sauna room. Insulation is the most critical component in ensuring your sauna will operate at it’s true potential.
Vapor Barrier
A vapor barrier between the sauna insulation and the tongue and groove wood plays an important role in encapsulating the sauna room, helping it maintain it’s heat more efficiently. Vapor barrier should be installed on every sauna, as it helps prevent mold. The vapor barrier is designed to trap heat in the room, letting it effectively dry after the sauna is no longer in use.
LED Lighting
LED Lighting in your sauna is completely optional. In our kits, we offer the ability to do just about any type of LED Lighting customization you’d like, all controlled through our smart sauna control system which is called SaunaLogic2. Our LED lighting is built standard into the benching backrests, but it can be added beneath benches or in areas where it makes sense.
If you opt not to include LED lighting in your sauna, some light source inside the room is a wise recommendation. We offer standalone lights specifically for saunas that will allow you to see while inside your sauna room.
Sauna Heater
The most important part of designing your sauna room is choosing the correct heater for the room. With a heater that is too small for the amount of cubic feet inside your sauna room, you’ll never have the correct heat. In addition, heaters that are underpowered are inefficient as they have to work harder to properly heat the sauna. This can lead to a whole host of problems, including wear parts needing to be replaced faster.
If you’re looking to save money on your sauna, do not choose to save money on the heater and control system. We’d love it if you bought ours, but you certainly can find another option. All of our sauna heaters, control systems, and building materials come with a 5 year warranty.
Heater Contactor Box
When you buy a sauna heater, you will need a contactor box that works with that specific heater. If you already own a Finnleo sauna, you may have a contactor box that will work with your heater. Always ask one of our sauna building experts first, as you may be able to save a few bucks by repurposing your system. Keep in mind, the new smart sauna controls with wifi may not work if you opt to go this route.
Your heater contactor box takes the power supply from your building and provides power to the sauna heater. If you are planning to build a sauna with a wood fired stove, this is of course not necessary. Some heaters such as the Finnleo Designer B w/ a Knob Control on the bottom don’t require a contactor box as the 240V power will wire directly to the heater.
Sauna Door
The door of your sauna is a critical piece that ensures your sauna room will hold heat effectively. We sell sauna doors that are pre-hung to allow for ease of installation. While you can certainly buy a sauna door elsewhere, the Finnleo latching mechanism on the sauna doors is one of the top selling points of the product. All of our sauna doors are built right here in Cokato, Minnesota.
Should you choose to order a sauna door directly from us, we offer multiple sizes and variations including; bronze tinted all glass, clear all glass, Douglas Fir wood doors, as well as etched and frosted glass doors.
You will need to know the rough opening of your sauna door, as expanding this when you are ready to hang the actual door itself just prior to finishing the sauna is a challenging task. If you choose to order your door through us, we’ll make sure that your jamb is built to the correct width, making installation a breeze.
Clear Sauna Benching Material
We recommend using only clear wood for building your sauna benches. Building sauna benches out of wood that features knots in it can lead to knots popping, or becoming overheated causing pain for anybody sitting directly on top of them.
Clear Sauna Bench Backrest Material
The majority of saunas feature bench backrests. This not only adds comfort when resting on your sauna benches, it also adds the ability to feature LED lighting inside your room, hidden from plain sight.
Just like your sauna bench material, the bench backrests should be built using clear wood. The reason for it is knotty wood gets hot in the sauna so while it’s completely fine (and normal) to use woods such as knotty western red cedar on the walls and ceiling, you should have a knot-free wood for the benches and backrest.
Tongue and Groove Sauna Wood
We’ve written extensively about tongue and groove sauna wood extensively on our website, so we won’t go too into depth with that here. Our custom pre cut sauna kits come in a variety of wood options including; Nordic Spruce, Clear Western Red Cedar, Aspen, Thermo-Aspen, Hemlock and Taika.
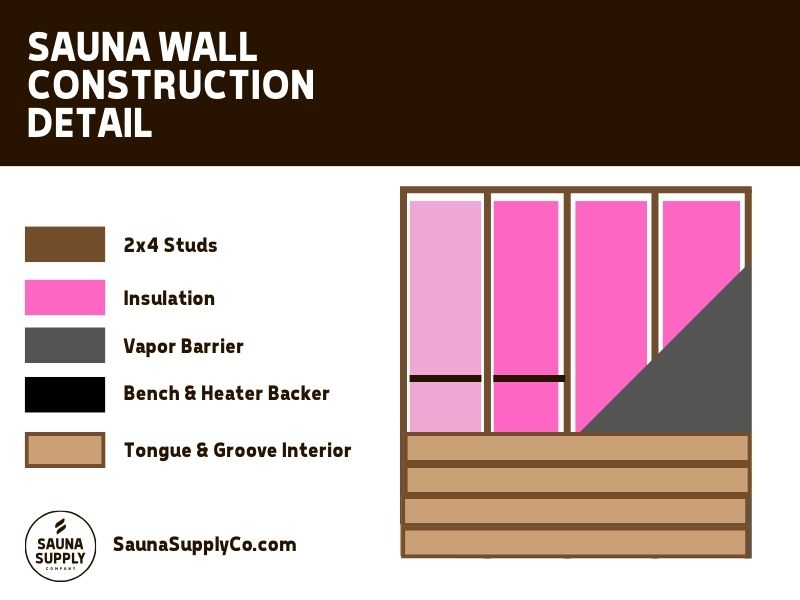
When assembling your sauna, it’s important that the correct order is followed. Below, we’ve displayed an image of a standard sauna wall construction detail to give you an idea of what this looks like.
Air Nails and Screws
For typical sauna building, an 18 gauge air nailer, a 16 gauge air nailer and a 23 gauge air nailer all have their place. In addition, a crown stapling nailer also has it’s place. Depending on which type or combination of these, you’ll need to have the correct size nails to assemble your room. An 18 gauge air nailer is the most versatile, as it can be used on trim as well.
If you’re going for a top of the line, designer look and feel to your sauna, you’ll want to use all three of these. Your crown stapler will be used on benches and building your door jamb, the 18 gauge air nailer will be used to hang your tongue and groove interior material and the 23 gauge air nailer will be used to make trim look immaculate.
Make sure that you’ve got enough air nails and screws on hand to complete your project. In our pre-cut kits, you will receive any necessary screws needed to assemble the room, but will need to provide your own air nails.
Tools Needed To Build A Sauna
The list of tools below is everything that is needed to install a basic home or outdoor traditional sauna. As we’ve mentioned above, there may be some tools that you may not need, depending on the space you are working with.
- Air Nailers
- Framing Nailer
- Miter Saw
- Table Saw
- Drill
- Impact
- Tape Measure
- Square
- Level
Planning Your Sauna Project
CLICK HERE TO DOWNLOAD PDF FOR CUSTOM CUT INSTALLATION GUIDE : 710-0101 Custom Cut Instruction 12-18-2018
The attached guide, and the steps below are for preparing and installing a permanently installed, custom cut sauna. We cover the interior of the sauna room, which is the same for both an indoor and outdoor sauna room. If you are going the route of a free-standing panel build sauna, the Finnleo units come with pre-built wall and ceiling sections, and just need to be assembled. You will want to prepare a floor space, or purchase a unit with the vinyl false floor option.
Permanently Installed Custom Cut Sauna.
Important Notes :
- Use a licensed electrician to wire power to the contactor box (the contactor box houses all the electrical) and heater. Wiring specifics depend on heater size.
- Each custom cut kit is cut to spec. It is critical to have the dimensions correct before the wood is cut, and benches are built.
Materials needed :
- Pin Nailer or Hammer (Pin Nailer saves a lot of labor time, use 1-1/4″ to 1-1/2″ galvanized pin nails)
- Mitre Box and handsaw for installing molding
- Drill or cordless screwdriver
- Tape Measure
- Square
- Level
- 3/8″ wood bit (if sauna has an L-bench)
- Torx bit is included
Room/Space Prep.
- Location – Decide where in the home you want the sauna room. Do you want a changing area, shower, toilet, sink? We recommend having a source of clean water close to the sauna. Refer to your sauna expert if you are unsure on the design.
- Floor – The floor should be waterproof. Don’t put carpet in a sauna floor. You can do tile, concrete, linoleum or vinyl flooring. A drain isn’t required, but you can put one in, consider adding a drain for easier cleaning.
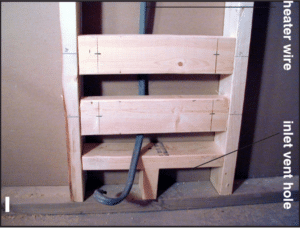
- Venting – You will need to two spaces to properly vent the sauna room. The vents are both passive, you shouldn’t put mechanical venting in a sauna. The inlet vent is in the wall directly behind the heater, about 2-3″ off the floor. The outlet vent should as far away from the inlet vent as possible, diagonally across the sauna room, about 24″-30″ off the floor. Both vents are 6″x4″ (Width x Height) inside dimensions, and should be framed as such. You will want to have space behind both vents for air to move in and out of the sauna room.
- Electrical/Lighting – You should have a certified electrician run a 240 volt power line to the sauna. The wire will connect to the heater contactor box. The wire will enter the sauna heater from the below, be sure to allow enough extra wire (18″ should be enough) to allow for easier final hook up to heater. From the contactor box, you will want to run the wiring in the walls before it is closed off for the heater, control, lighting, and soundbar (optional). Your electrician will again run a 240 volt line from the contactor box to the heater itself, we provide the wiring for the control, lights, and soundbar.
- Frame and insulate the sauna room
- Framing Walls and ceiling – Recommend using standard 2×4 framing. Recommend framing the ceiling down to a 7′ finished height, no more than 8′ (anything higher will void our heater warranty). Place a 2×4 in each corner so you can nail the ends of the T&G into the studs. For the baseplate, we recommend using treated 2×4 to protect against moisture on the floor.
- Insulation – Use R11 (or better) unfaced fiberglass batt insulation in the walls and ceiling. In the ceiling, use a single layer of 6″ insulation, or a double layer of 3-1/2″.
- Framing the door – Frame the doorway with with 2 – 2×4 for added strength, make sure it is plumb and square. Fit your doors to the specific door rough opening, confirm with your sauna expert or door supplier for specifics.
- Preparing the heater location – if using a wall mounted heater, add two additional 2×4 supports in the wall where the heater will hang. Refer your sauna expert for heater location if you are unsure. The heater mounting brackets are placed after the T&G is installed.

- Installation
- Vapor Barrier Foil – We use a perforated foil vapor barrier on the walls and ceiling. You cover staple the foil onto the studs over the insulation. The Foil helps to reflect and hold more heat in the sauna room, and a vapor barrier. You can tape the joints with fail tape (not provided).
- Tongue and Groove – Tongue and groove is installed over the foil vapor barrier. In a custom cut kit, the boards are cut slightly shorter than the wall/ceiling length to prevent binding and tearing of the vapor barrier. If proper dimensions are provided, no additional cutting is needed. *Note – Recommend you install the T&G with tongue side up, this helps to prevent any moisture from collecting in the groove.
- Ceiling – Install the ceiling ceiling T&G before the walls so the ceiling boards are supported at their edges. Face nail through the board on each end, stay far enough away so you don’t split the wood (Figure N). These nails will be covered later by trim. Your last boards will most likely need to be ripped to fit. *Note – measure each end after installing every 3-5 boards to prevent “fanning”.
- Walls – You then nail the T&G over the foil with pin nails, onto the studs on the walls and ceiling. Recommend using 18 gauge brad nails. T&G will go perpendicular to your studs. If you want vertical T&G, you can add horizontal furring strips over the studs. Leave at least a 1/4″ gap between floor and T&G. There are two different methods, Top Down and Bottom Up, both instructions below.
-

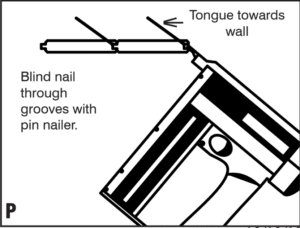
- Top Down (When using a pin nailer)
- Start at the top of the back wall and position your first piece of T&G
along the wall with the tongue towards the ceiling. Making sure it is
level, nail it into place using the same method shown for
the ceiling T&G; face nail along the ends and blind nail on each of
the studs. Any gaps between your ceiling and your top wall board
will later be covered by trim.
- Start at the top of the back wall and position your first piece of T&G
- Bottom Up (When using a hammer and nails)
- In order to keep your T&G application level and dry it is necessary to
first put a starter board at the bottom of each wall. Find the highest point on the sauna floor to use as a reference. Assuming your ceiling is level, measure down from it in each corner and mark a common distance (1/4” minimum) short of your reference point in each corner. *Note – Keeping boards off the floor prevents them from soaking up any moisture that may accumulate there. - NOTE – In order to keep your T&G application level and dry it is necessary to first put a starter board at the bottom of each wall. Find the highest point on the sauna floor to use as a reference. Assuming your ceiling is level, measure down from it in each corner and mark a common distance (1/4” minimum) short of your reference point in each corner.
- In order to keep your T&G application level and dry it is necessary to
- T&G Installation Cont. (For both methods)
- Continue fastening your T&G along the wall until you reach
your last board either at the top or bottom. You may need to rip
your last board to fit making sure your bottom board is at least 1/4”
off the floor. Finish the rest of the interior in the order of back wall,
side walls, and lastly the front (door) wall. *HINT: When installing the short pieces on each side of the door or windows use a full length board as a guide to keep the pieces on both sides aligned and level; then nail them into place.
- Continue fastening your T&G along the wall until you reach
- Vertical Wall T&G Installation
- Your first board on each wall should be fastened with the tongue side
towards the corner if you are using a pin nailer and the groove side
towards the corner if using hammer and nails (as was done for the
ceiling). It is easiest to work from left to right if you are right handed
and vice versa. Always butt your vertical boards against the ceiling to
keep them about 1/4” off the floor. Face nail your boards at the top
and blind nail them at each nailer as was done for the ceiling. Your interior trim will later cover the nail heads at the top. *HINT: When installing short pieces above or below a window, use a full length board as a guide to keep the short pieces aligned and level. - Keeping your boards vertical, continue blind nailing them into
place along the walls until all your walls are covered. Your last board
on each wall may need to get ripped in order to fit into the corner.
- Your first board on each wall should be fastened with the tongue side
- Outlet and Inlet Vents
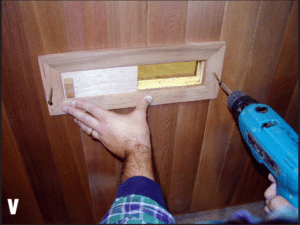
- Outlet Vent – The vent valve is to be placed over the outlet vent hole in the interior of the sauna. Slide the valve door open and place the opening directly over the 6” x 4” cutout. Making sure it is level, fasten it with two 1-1/2” screws (figure V).

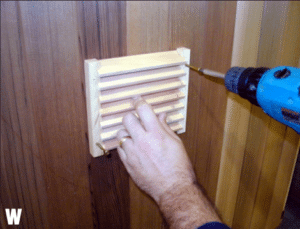
- Inlet Vent -From the outside of the sauna, center the wood grill over the exterior
of the 6” x 4” cutout, with the louvers facing down. Making sure it is level, fasten with four 1-1/2” screws (figure W). If your back wall is hidden, the grill is not needed. *NOTE: In most cases the inlet vent under the heater will be covered by the heater so no grill or trim is needed on the inside; the outside grill is provided. If you must place your inlet vent in a location other than below the heater you can purchase another vent grill from your supplier.
- Outlet Vent – The vent valve is to be placed over the outlet vent hole in the interior of the sauna. Slide the valve door open and place the opening directly over the 6” x 4” cutout. Making sure it is level, fasten it with two 1-1/2” screws (figure V).
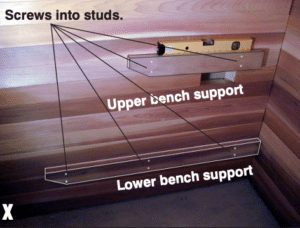
- Bench Supports
- In most cases your lower benches have longer supports to allow them to be slid in and out for easy cleaning. Measuring from the floor, mark a line at 12” and 30” on the walls where your bench supports will be fastened. These measurements will be the top edge of the 2×4 supports. Each support is long enough to span at least 2 wall studs. This will allow for at least two 3-inch screws, per support, to be anchored into wall studs for necessary strength. Making sure they are level, position them on the wall and use 3” screws to secure the supports to the walls (figure X).
- *NOTE: By using the above measurements your final bench heights will be approximately 18” for the lower and 36” for the upper benches. If you have a ceiling height other than 7’ these bench heights can be adjusted for head clearance or better heat.
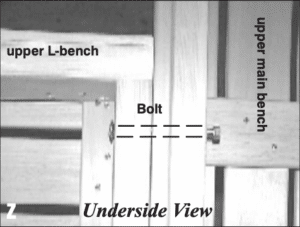
- **NOTE (for saunas with an L-shaped top bench): On saunas having an L-shaped top bench, you will have an additional upper bench support. Fasten them to the walls so the tops are 30” off the floor. Two 3/8” holes have been drilled through the frame of the upper L-bench. With the top of the upper benches aligned, use a 3/8” drill bit and drill through the 2 provided holes and through the face of the main upper bench. Bolt the two benches together using the 5-1/2” carriage bolts provided (figure Z).
- In most cases your lower benches have longer supports to allow them to be slid in and out for easy cleaning. Measuring from the floor, mark a line at 12” and 30” on the walls where your bench supports will be fastened. These measurements will be the top edge of the 2×4 supports. Each support is long enough to span at least 2 wall studs. This will allow for at least two 3-inch screws, per support, to be anchored into wall studs for necessary strength. Making sure they are level, position them on the wall and use 3” screws to secure the supports to the walls (figure X).
- Trim / Moulding
- Cove Moulding – The cove molding (3/4” x 1”) will be provided longer than needed to allow trimming to exact size to insure a tight fit. Measure each wall to determine cut length. A simple butt-end cut is the easiest. Cut molding straight, then butt the pieces together (figure AA). If you prefer a mitre joint, the molding is long enough to accommodate that type of cut as well. Using #4 finishing nails, nail the cove molding to the walls.
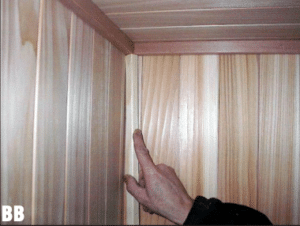
- Corner Moulding – The corner molding (3/4” x 3/4”) is used to trim the corners of the room where the walls meet (figure BB). On corners without benches, cut molding full length and install with finishing nails. On corners with benches, cut the molding in two pieces; one from the bench surface
up to the cove molding and the other from the bottom of the bench
support down to the bottom of the wall T&G.
- Cove Moulding – The cove molding (3/4” x 1”) will be provided longer than needed to allow trimming to exact size to insure a tight fit. Measure each wall to determine cut length. A simple butt-end cut is the easiest. Cut molding straight, then butt the pieces together (figure AA). If you prefer a mitre joint, the molding is long enough to accommodate that type of cut as well. Using #4 finishing nails, nail the cove molding to the walls.
- Backrest – Position your backrest in the mid-back/shoulder blade area, whatever
feels most comfortable. A typical height is 20” from top of bench
to top of backrest. Making sure it is level, hold the backrest at your
preferred height, fasten it to the wall through the predrilled holes,
using 2” screws (figure CC). Wood plugs are provided to cover the
exposed screw heads.
- Lighting – Finnleo offers three lighting options; LED strip lighting (can be installed behind the backrest, under or in front of bench, or in a ceiling valence), Puck lights in the ceiling, or a wall light
-
- LED strip lighting – When paired with the SaunaLogic 2 control, the lights are RGBW, colors can be changed via the control itself or the mobile app. When you order a full room, we install the strips on the backrest, bench or ceiling valence for you. You will need to run the wiring from contactor box through your walls, before they are closed off to the location where it will plug in. Refer to your sauna expert on details. For further detail, please refer to the LED strip lighting manual here >>>
- Puck lights (in the ceiling) – Again, if you are using a heater with the SL2 control, the lights are RGBW. If using a different control, the lights are white. The standard puck light package is three lights. If you think you may want more, I advise a discussion with your sauna expert. A common mistake is having too much light in a sauna, most people prefer a dimly lit sauna room. You are trying to relax after all! Same practice applies as the strip lights, you will run the wiring from contactor box through open walls to the light locations in the ceiling. For further detail, please refer to the Puck Lights lighting manual here >>>
- Wall Light – The wall lights is a simple light that is white and in encased in a frosted globe. Again, you will run the wiring in the open walls from contactor box to the light location on the wall.
-
- Sauna Heater –
- Wiring – As previously discussed, the wiring for the heater should be done by a licensed electrician. Most heaters require a dedicated 240 volt power, that is run both to the contactor box and from contactor box to heater location. The wire to heater will be on the floor, remember to leave about 18″ of slack for easier connection once the heater is in place. Specific electrical requirements depend on heater type and size (KW).
- Rock Placement – Rinse the rocks before placing them in the sauna heater. Place the smaller and flatter rocks around the outside of the rock compartment and the larger rocks in the center (photo DD). This will allow for good air transfer through the heater. Do not try to force all the rocks in, It is important to have space between the rocks to give optimum heater performance, faster heat-up time and higher temperatures. Save your extra rocks for replacements.
- Heater Guard – Place the heater guard around the heater as described in your heater instructions; spacing may vary according to heater kilowatt. Making sure it is level, fasten it to the wall with 2” screws. NOTE: The front rails of the 2-sided heater guard can be cut to desired length before assembly.
- Door –
- The door is pre-hung with a jamb. Please note that sauna doors must always swing out. Remove the screw securing the door to the jamb which was in place for safe shipping.
- Place the door into the framed opening and fasten the hinge side to the 2×4 frame using provided 3” screws. Mount so the door jamb is flush with the surface of the exterior wall material. Be sure the door is level and plumb. If it is not., use shims between the opposite side jam and frame. Check for uniform spacing at the top of the door and jamb then continue to fasten around the frame.
- Note: If using a wood door for an outside sauna application, it is recommended to seal the door on all sides including the edges to prevent condensation damage. (All six sides)
- After the door is secured in place, install the jamb extensions if provided. The jamb extensions should be flush with the surface of the T&G on the interior sauna walls. The tapered edge of the jamb extension butts up against the existing door jamb. The easiest way is to nail the extension to the side of the framed opening (an alternative method is to attach the extensions to the door frame itself). After jamb extensions are secured, install the interior door casing provided. The casing should cover most of the jamb extensions (leave about 1/8” of jamb showing for a reveal). Nail to the jamb and to the walls inside the sauna room. The exterior of the door is typically trimmed to match the molding in the adjacent room. If exterior T&G was purchased, extra trim is provided.
- A pair of door handles is provided with each door. Using the screws provided, install the door handles with the center of the handle approximately 36” off the floor (or whatever height is most comfortable). After the handles are fastened, install the provided wood plugs to fill the holes.